Tuesday, December 22, 2009

Christmas Freezer Paper

Freezer paper stenciling creeped into my Christmas decorations...


and I couldn't be happier :)

Here are some more detailed instructions--this was my first attempt to take pictures with every step, so sorry I don't have all of the pictures:

1. You need freezer paper. :) The only place I found it was Wal-mart; next to the tin foil. Cut out a small square/rectangle/circle to cover your idea and onesie; do this three times per onesie. Set two aside until you're ready to iron.

2. Now's the time to put your design on the paper. I usually make my designs in word, publisher, or acrobat, print it out on regular paper and trace it to the freezer paper. (The reason freezer paper can do this is because it has a light adhesive on one side of the paper and it bonds to your project when heat is applied). The adhesive side feels grainy; it's the side that will face your onesies. Trace your design to the SMOOTH side of the paper.

3. Next is the cutting. Use masking tape to keep your design from moving around the cutting surface (I usually use a spare piece of cardboard---diapers' boxes work real well). Think about what areas you want the color of the paint and color of the onesie; cut out the most intricate parts first and remember to save the small pieces needed for white spots (like the middle of an A).
4. Set the iron to cotton/wool; basically you just want to make sure the iron isn't on steam. First, take the second full piece of freezer paper and iron it to the inside of the onesie with the grainy side facing up toward you; this keeps the paint from leaking to the back of the onesie. Check to make sure it's stuck to the onesie.

5. Then, iron your cut-out to front. Iron from the biggest to smallest piece. It takes a couple of seconds for the paper to bond to the fabric. Just make sure it's on there well; be careful not to touch it too soon or you'll get a nice heat shock.

6. Paint. I use an up-and-down motion just in case the paint seeps. Let it set for a 15 20 minutes, then paint another coat.
7. After the paint in fully dry---I usually give it a couple hours---take the stencil off and iron the other full non-cute freezer square on top of the new painted design (this seals it and keeps it from coming off in the wash). Wait for the paper to cool and peel the inside and outside paper off.

Congrats---you've successfully made a new onesie and have become addicted to a cheap and easy way to vamp up kids' clothes--or Christmas stockings!

Thursday, December 17, 2009

Hair Clips & Holder

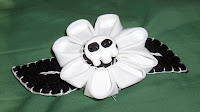
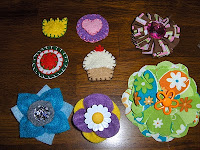
Before 'Princess' was born I went a little crazy making hair bows (a girl can never have too many) and all of these pictured went to VT sister who also recently had a girl, so I don't feel too bad for making so many:

Exhibit A

Exhibit B

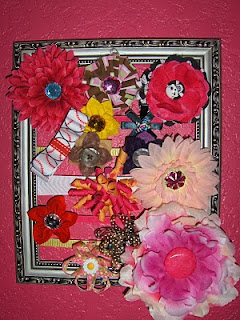
Since I made so many bows, I needed to make a place to put them. Enter Exhibit C:

Here's what you need:

an old frame, ribbon and a glue gun---That's it!

Strip the old frame down. Throw away all the photo backing stuff and use pliers to take out the little metal pieces. Then flip the frame over and lay out your ribbon. Glue the free end to the frame, pull tight then cut. Glue the other end of the ribbon. Continue gluing ribbon until you reach the end. Then put the bows on the holder and hang it up for the world, your kids, to see.

Monday, December 7, 2009

Once There was a Snowman...

This is the latest addition to the Christmas decorations. I knew that I wanted to make a snowman originally thought of giving him the traditional top hat. But when I was over a Nett's this weekend there was this tiny hat on the fireplace. She had no idea where it came from and I thought that it would be perfect for this guy. I started making him at Nett's and showed it with the hat on. She thought it was cute, so I kept going. I don't think I really ever asked if I could use it though... Sorry about that, Nett. If it's not o.k. then I can crochet it another hat. ^^; I guess I was excited to make it... Anyway, he's about a foot tall without the hat on. The more I look at it I wonder if I should have tried to do something else than the snowflakes at the bottom. Oh well. I guess if I end up not liking them then I'll change it

Thursday, December 3, 2009

Christmas Advent Calendars

Last Christmas season, I felt a overwhelming desire to create more family traditions, so we can have them established 'as long as the kids can remember.' One things I like a lot about Christmas time are Advent Calendars, so I made two.

I spent most of January making this one:
(Click here to get the instructions). UPDATE 2011: The link has been taken down, basically it's a piece of duck cloth, a lot of felt, glue & cutting. Here's a magnetic version from {Say It On The Wall}

If you can't tell, it is Joseph & Mary travelling to the stable over the month of December; once they get there baby Jesus is placed in the stable. I made one for us and one for our dear friends. I also taught a class last month (a couple days before little princess was born actually) to fellow women for their families.

I spent March & one May day to make this one (tutorial found here):

Each day has a Christmas related activity in it. The kids will pull it off in the morning and then we'll do the activity some time that day. Activities include: Christmas Tree Campout, watch Christmas movies, make cookies and give away, etc. I spent time looking for ideas and picked our top 25. Over the years, the activities will rotate days. Some activities are too old for my kids so we'll probably just color and watch old Christmas specials on those days.

All in all, I was really excited to make these and now I'm really excited to use them this month! Now, get crackin' all and create a calendar for your family--- it's not too late!

giveaways

Sunday, November 22, 2009

My First Thanksgiving

What happens when you have a baby right before Thanksgiving and you forgot to get her anything with the 'my first thanksgiving' phrasing on it? (True Story)

Well... you make it of course. With a little muslin, floss, turkey iron-ons, felt, snap clip, and one long-sleeve gerber 0-3 onesie. A crisis can be averted. Your baby will have a onesie and hair clip for a happy turkey day.

Yay for a happy Turkey Day.


Saturday, November 14, 2009

More Charms & Another Headband

I was trying to think of charms that would probably sell in the future. I'm gradually making a stockpile of them to sell. These mushrooms are some of what I was thinking I could sell. And then my fruit blobs, of course. They're my own design and I thought it would be nice to have them in rainbow order to take a picture of them.


Well, I couldn't stop there. I kept on going. First I made other charms like the ninja and the Teenage Mutant Ninja Turtles. Funny thing about the ninja and animals. I actually made them thinking I would photograph them separately. As time went on I thought that it would be kind of funny to put them in a picture like this together. (I knew that my camera hates taking single charm photos, so this was the best solution really.) I think it actually turned out pretty cute. xD


The Teenage Mutant Ninja Turtles are actually charms that I've been wanting to do for a while. I just kept forgetting to do them or ran out of time. I like how they all have individual personalities and their shells.


Coraline's doll actually came to being when I decided that I wouldn't be able to make an actual doll myself. I don't have the money to obtain the materials so this was the next best thing I could do. This is my favorite charm that I've made. I did my best to get all the details that I could into the charm. (Like two holes on the yellow buttons and four on the black ones.) She even has a wire body on the inside to give her more strength. I was pleasantly surprised when I finished her. I didn't think that I could actually pull it off. But here she is! My pride and joy of the charms. ^^


And finally since I'm going to see New Moon on Friday with Jenni, I thought I would make the Cullen Crest as one of my headband attachments. It can slide onto any kind of ribbon and certain headbands. I'm please with how it turned out. ^^ Now I'll be able to wear it with my other Twilight inspired charms. xD

Thursday, November 12, 2009

Charms, Charms, Sculpture.

I was coming up with some new ideas for charms that I could sell and this is what happened. First I created a cat, monkey, and then Max from Where the Wild Things Are. I used the same star shaped that I developed while making some Harry Potter charms. The face turned out too big on the cat and I was too lazy to fix it. (Not in the future though. I won't let laziness get in the way of my crafting again.) I still like how they all turned out though. (Oh, and Max has a cute tail. My camera was being stupid and wouldn't get the tail without washing it out.)


After those three I decided to make a bun of snails. Why snails? I don't know. I thought they would be cute and simple. Turns out that I was right. My favorite one is the purple shell with a blue body. The mushroom was just something fun to make. In the future I'm going to make more of them in different colors.


Then when I was done with the snails, I remembered that an Aunt's birthday was last week. We were going to go do a dinner over the weekend but people ended up getting sick. Then we were going to try on Monday but it go rescheduled for this coming Saturday. So I can actually have a chance to give this to her now. My aunt always seems to like the things I make and this seems to fit her.

Monday, November 9, 2009

Mini Bunny Amigurumi

Meet the newest addition to the miniature amigurumi. I started this one about a month ago and finally finished it yesterday. I ended up being so busy during last month that I only got the things done that needed to be done. I don't think that this one took too much time to do. It takes about as long to do him as the bigger amigurumi. He's my favorite out of the miniatures

Friday, November 6, 2009

Headband Attachments and a Locket

I've had this feeling for a while that I need to start selling the things that I make. So yesterday I started to make things that I could possibly sell. These four things are what I'm calling headband attachments. You can slip them on any ribbon or headband and wear them. They were all pretty fun to make.

These flowers are known as kanzashi. It's the japanese art of making flowers out of fabric. Usually these flowers are made for geisha to wear in their hair and out of silk. As we can see, I don't have any silk and this is my first time making kanzashi. I actually attached the backs of the petals wrong in the first one and did it right in the second one. I personally will only wear the first one. The second one I made in mind for my 4 yr-old cousin.


This is just three skulls made out of polymer clay and wire. I painted them with acrylic paint and slipped it onto a ribbon. I wore it to school today and someone noticed it. they actually asked me where I bought it. I had to tell them that I made it. ^^

The second one with polymer clay and beaded stars. It's my least favorite out of the bunch. I really like stars and wanted to make something fantastic with them. Unfortunately I don't have any ribbon to sacrifice for it so it came out like this.


This is a locket that I made for my aunt. She decided that she wanted to be a Steampunk chick for Halloween and I thought that this would be perfect. I ran out of time to print the pictures of her kids to glue in there. I also need to figure out how to make it close properly. The next locket maybe. ;)

Wednesday, November 4, 2009

Thankful Turkey

I got this idea last holiday season from a magazine and we've made it into a tradition. It's not to late to start your own. Meet Tom the Thankful Turkey.

All you need to create Tom are: two different-sized styrofoam balls, felt, two tones of brown yarn, tacky glue, construction paper, toothpicks, and tape.
  1. Shave the bottom off of the larger ball---remember to shave enough so that your turkey will stand upright.
  2. Wrap the larger ball in the darker color of yarn and the smaller ball in the lighter.
  3. Using the felt, cut the shapes needed to give Tom a face. Then, use a few toothpicks to attach the two balls.
  4. Draw feather shapes onto the construction paper and cut out.
  5. TA-DA---you've made Tom the Thankful Turkey!
Now, take a little time each day to write something, anything you are thankful for onto one of the feathers. Tape a toothpick to the back of the feather and stick it in Tom. Have every member of the family do so---even the ones who can't quite talk yet.

By Thanksgiving, Tom will be a very full-feathered turkey and you and your family can take the time to read the things ya'll wrote down over the month! It's a cute way to get your young kids involved and thinking about what they are thankful for.

Take the time to be grateful for all your blessings!

Saturday, October 31, 2009

A Birthday Amigurumi

A roommate that I had last year had her birthday this past Monday. She comes over a lot and it's nice to have her over. She always seemed to enjoy the amigurumi that I made. She even threatened to take some of them when I wasn't there. So I finally got around to making one for her.

For this amigurumi I used camouflage, white, and pink yarn. The camouflage yarn gives a nice striped texture to it. It actually gives me an idea for a present for my younger brother this coming Christmas. I just need to get a hold of some yellow/orange/red yarn to do it. ;) I'm not entirely sure how long this amigurumi took to make. I had to rush it since I started making it on her birthday. I think it turned out pretty cute. I almost wanted to keep it myself. xD

Thursday, October 29, 2009

Easy Halloween Jar Lights

At the beginning of October I made these to give to my visiting teaching sisters:

I got the idea here, and noticed my cousin and her neighbor made some at the same time I did (here). Instead of using stringed lights or a real candle, I put a battery-powered flicker light at the bottom and stuffed them with candy.

These are REAL easy to make, so if you don't have anything up for Halloween QUICK--- find an empty jar, some tissue paper, mod podge (or something similar), construction paper--- and MAKE ONE (or two)! Here are the steps:
  1. Clean out your empty jar and cut the tissue paper into strips.
  2. Apply a base coat of mod podge to a section of the OUTSIDE or your jar then GENTLY press the strips onto the jar until the podge is covered. Repeat until the whole jar is covered. Let dry for a few hours.
  3. Using the construction paper, cut out a face for your creation. Once the first coat is dry, apply podge to the back of your face pieces and place onto the jar.
  4. Wait a few minutes and then apply a even coat of podge over the whole creation and let dry overnight.
  5. After dry, place your preference of lighting into the jar and enjoy!
I also made some for my family too, since they were so easy to make. My picture is on the camera and my transfer drive went into a hiding amidst the move, but I made a pumpkin, ghost, Frankstein and Spider. Frank was made from a tall Pace jar and Spidey was a jar of unopened baby food leftover from Little Knight's pureed days.

NOTE: Since we moved into our house, I haven't been able to get to any of my craft stuff. My darling husband says it's getting me ready for the couple months after Little Girl is born; I say I'm wasting my 'nesting' energy. (I'm actually using it to get a few things organized and decorated) :)

So, my goal is to get a couple more things done before Little Girl is done, but I guess, like everything else in our lives right now, it's a wait and see... so ya'll will have to as well!

UPDATE: Here are my jars...

Thursday, October 22, 2009

Gospel Quiet Book

Don't forget to follow us, if you haven't already!!! My next few posts are not new crafts, but things I did right before we moved into our house (hence the reason for the lack of posting).

Now that I've finally mailed the second book, I have no hesitation in posting the page pictures.

The only template I used was for Joseph's coat (found here); every other page is a Ambo creation. So, if you happen to enjoy the pages and use them as inspiration, please link here and give credit.

After baby girl's birth, I just might make templates, if there is a big enough demand and we somehow get more readers...

Picture 1: Noah's Ark--fill with animal finger puppets, Tree of Life--sliding people & snapable fruit, Pioneer Wagon--lace cover & attach wheels, Temple Puzzle Page---build temples, & Time for Tithing--pay tithing with envelope and slip inside
Picture 2: Joseph's Coat--colors snap on and off, Jaredites' Journey--boats unbutton from glowing stones, Singing Voices--felt note and beads slide, Puzzle Storage--for temples, & My Scripture Case--pack scriptures for Sunday, can even put real pencil and paper for drawingPicture 3: Temple Puzzles for puzzle page
I made these all for a friend and, after taking a long, much needed quiet book break, I will have no choice but to fulfill the urge to make some for my own children. :)

Monday, October 12, 2009

Freezer Paper Stenciling

I discovered this a few months ago and did a bunch for both my Knight and future Princess.Since it's really easy, it's really really addictive! All you need is a shirt, Freezer Paper (I only found it at Wal-Mart), acrylic or fabric paint, exacto knife, brush, iron and an idea. The possibilities are endless.

Draw your own design out on the paper, print it out (after cutting it to fit your printer), or trace it onto the smooth side of the paper. Cut it out with the exacto knife (cut out the small pieces first). Then iron it onto the shirt with a full piece of paper also on the other side. Paint the design, wait for it to dry, then take off the stencil. Last but not least, iron one more piece of paper over the design to heat seal it. Wait for it to cool down and TA-DA!!! A new shirt for your child!!!

Last week, I made this Halloween shirt for Little Knight.
Isn't he cute?!?!

Thursday, October 8, 2009

Gospel Quiet Cards

I wanted something 'little knight' can look at during those church moments where he seems to be on his last 'good behavior' leg. So, this is what I came up with:


Basically, they are Gospel Flash Cards. Wanna make your own, it's real easy! The great thing is that this project is so flexible you can make as many or as little cards as you want!

What you need:
  • Clip Art and/or Pictures for each subject
  • Book Ring or Ribbon
  • Any kind of Publishing Software or scrapbooking supplies for all you handy scrapbookers out there!
  • Scissors
  • Some type of lamination (I did mine at Kinko's for under $5)
  • Single Hole Punch
Instructions:
  1. Go through and pick however many gospel topics and/or principles you want for the cards. If anyone needs inspiration, here's my list: Jesus Christ, Joseph Smith, First Vision, Book of Mormon, First Presidency, Twelve Apostles, Baptism, Gift of the Holy Ghost, Atonement, Sacrament, Temples, Priesthood, Articles of Faith, Plan of Salvation, Tithing, Word of Wisdom, and Second Coming.
  2. Once you have a list then find pictures and/or clip art to go with each card. (I used a lot from Free LDS Art).
  3. Then, using your publishing software (word, publisher, etc.---I used my lovely scrapbooking software) choose a size to make your cards (mine are 4 x 6) and put the picture with the right card. Some of my cards have more than one picture because I didn't want the picture to look all pixily.
  4. Onto the back: write a little bit about the subject for the back of the card. For example, on the Jesus Christ card, I wrote: Jesus is the Son of God. He died so we can live with Heavenly Father, Him and each other forever. He is our Savior. (Remember to make your back the same size as the front).
  5. You can either choose to print them front to back or separately, either way, print it all out. Match them up and go get them laminated. If you happen to have a friend who has a machine, borrow it! OR you can you Contact Paper (not as durable and kind of tricky) OR go to Kinko's and use their machine. If you don't know how to use it, they'll show you!
  6. Cut out the cards, leaving enough room at the top to punch a hole, and string them through the ribbon or extra book ring!
Now you have a set of gospel cards that your kids will use plenty of Sundays. Our little knight loves to look at the pictures, he even sits quietly in my lap during sacrament to look at the sacrament picture and watch the boys (he's 17 months old). Trust me, you'll have smoother Sundays if you make these cards!

giveaways

Sunday, October 4, 2009

Humanoid and Tutorials

This was the amigurumi that I did before the cupcake and onigiri. It is, by far, my favorite. If you know Beth Doherty and her work, then you'll see some resemblances. I'm inspired by her stuff. She's great at what she does.

I wanted to create a humanoid pattern of my own that I actually liked. I thought that he came out great. Although, he did come out a lot tougher than the drawing I did beforehand. xD Someone also on Gaia Online wanted to know how I embroidered my amigurumi and how I made clothes. So I made some tutorials. Here they are:

Friday, October 2, 2009

My First Quiet Book

About a month ago, I spent two weeks of my extra time sewing, hand-sewing, ironing, cutting, cursing felt and a missing zipper foot, I did what I set out to do--- I made a quiet book for our kids.

It's not perfect, but I made it and that makes it all worth it.

I used a lot of resources, most stemming from the blog: How to Make a Quiet Book. I changed a bunch of things to my liking, however, I recommend this site for anyone who is silly enough to attempt their own.

I just recently finished a gospel-themed Quiet Book (yes, two in two months and my husband and child are still alive) for my best friend's daughter, but I'm not posting that until I send it off... so stay tuned!

I'll expound on them at a later date, maybe even throw in a couple of templates (especially the gospel one because it's more of my brain-child), but, for now, I have a few other things I want to accomplish while my son attempts to sleep... we're having a rough day.

Here are the pages:

All of them pre-sewing binding

The finished numbers page (props to my husband and his mad knot-tying skills or this page would still be unfinished)

Thursday, October 1, 2009

Amigurumi Onigiri and Cupcake

Here's the deal. I'm going to start with my most recent crafts. There way too fetching many for me to post on this blog. (I do have over 2 yrs. of crafts and that's a lot to fish through.) However, I might go back and find my favorite crafts to show. It just won't happen instantly. Without further ado...

Last month's Ami-Along theme was food. I was able to finish these a few days ago and still was able to post them up on Gaia Online to show the other amigurumi enthusiasts before September was over. I also wanted to do a doughnut but I ran out of time. When I make more cupcakes in the future, I'm going to fix that icing edging. It doesn't look as wavy as I want it to be. I think I figured out the problem though, so it should be really simple.

I'm also debating if I want to share my patterns. Mainly I don't want to share them because I want to sell these things someday. I do know how cool it is to find something you love for free though. I enjoy the internet for that reason. I just don't know if I'm ready to give out the patterns just yet. ;)

Past Craft: Nursing Wraps

I was only mildly aware of this trend when I first had 'J' (what he'll be known as from now on) and by then I already had a blanket which worked rather well. I say rather well because once he could grasp the blanket I had a few awkward Mother's room moments. So, when we found out #2 was joining us I priced check these bad boys, all costing around $40. I knew from the little sewing experience I had, I could beat the price with my eyes closed; the only thing left was to find a pattern.

With the invention of blogging my task became simple because I found template here and here. I did a combination of the two because 1---I wanted D-rings and 2---I wanted it to be reversible. I also changed the length of the boning to 13 inch. 18 inches was WAY too long. The first one took maybe 6ish hours and the second only 3!

So, for the same price as one store bought 'hooter hider' I made four! Now I just have to wait 6 months to use them! ;)

Wednesday, September 30, 2009

I Started Crafting...

Well, forever ago. Crafting has always been there for me. From small doll clothes to costumes, I liked to make about anything. I would list what I've done but I guess I can show some of my old stuff in pictures.

This is the first amigurumi that I ever made. He's over two years old and resides with a friend now. It was her Christmas present that year. I really like to make amigurumi and have gotten a lot better over the years. Expect to see lots of them from me. ;) Oh, and I'm on a thread on Gaia Online where we have monthly Ami-Alongs. So you'll see at least one from me every month.

These are the first charms I made out of polymer clay, acrylics, and Sculpey Glaze. These are also about two years old and are stored with my other charms. (There are a lot of them.) You'll more than likely see a lot of these in the future as well. =3

I'm currently working on my Halloween costume for the most part. It should be done by the 17th though since I'll be going to an anime convention. That's right; it's a cosplay. But that will have to wait until I get pictures of me in it.

Monday, September 28, 2009

What Started it all... My Little Knight

About a year ago, my adorable son was about to experience his first Halloween. I had previously made curtains and pillowcases for my living room and decided it was time to branch out try a Halloween costume. Mostly I wanted to try because our mom made costumes for us when we were kids and I wanted to do the same.

After a month of frustration, many seam rips, and crying over my sewing machine, this was the result:
I failed to recognize my son's huge head, nevertheless, I did it. If I remember right it was a McCall Baby Costume Pattern.

As I look back, this project is what started my desire to naptime craft. Since then, I've made a lot more crafts and have a 'To-Do' list a mile long. I'll post pictures of what I've done so far, and continue to do so with my newest creations.

This year, with our daughter coming a month after Halloween, I decided to do something smaller for Halloween... but that's a whole other post.