Showing posts with label girl. Show all posts

Wednesday, April 23, 2014

All Things Pretty Necklace Review

NOTE:  A lot has gone on in our break.  The biggest one to affect this blog is the Mule of  MnN Crafts just recently left to serve an 18 month mission for the {Church of Jesus Christ of Latter-Day Saints} in Taipei, Taiwan.

Our whole family is really excited & her desire to serve has re-inspired me to start blogging about my crafting endeavors again.  One of the reasons I got into this was the digital ability to share ideas with others who are looking.  So, long story short--- I'm back!

I figure the best way to come back is to write a review for my fabulous new necklace from {All Things Pretty}.

 Danesa, over at ATP  contacted me about a month ago to see if I'd do this review & what kind of jewelry I like.  I gave her an over-complicated task of finding something that I loved.  And she did it.

This is the {Suzanne} Necklace.  It's seriously adorable. (Don't mind my pose & wierdo nature).

I think my favorite part about his necklace is that I can wear it two ways.

I love versatility in jewelry.  And All Thing Pretty is definitely versatile; I know it sounds SUPER corny, but there really is something for everyone.  This is perfect place to find a Mother's Day gift (hint, hint).

Check them out on {Pinterest}, {Facebook}, or on their {website}.  You won't be disappointed; as you can clearly tell my pensive 'yay for my new necklace' pose. 

DISCLAIMER:  I was given this necklace for free to write a review.  These are all my own opinions, yada, yada, yada.  :)

Danesa also has a great blog called {The Pink Senorita}.  You should check that out, as well.

Monday, March 15, 2010

Girly Nursery

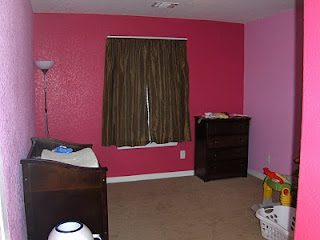
We finally finished our little girl's nursery and I have to say, it's one of my favorite rooms in the house. I think I love the kids' rooms and downstairs because they're all painted. So---here's the rundown on what I did.

First off---I found fabric I wanted to use in her room. From the fabric I pulled the two paint colors: a light pink and fuchsia-type pink. Then we painted. :)
Second---One the long light pink wall, where her WHITE crib is we painted circles to frame the letters of her name. Don't know how to paint circles? Find a bowl in your kitchen in the size you want and use a pencil to trace it on your wall. Then paint--- it's that simple!
Third---On the window wall I made inexpensive art and the valence for the window. I got plain wood embroidery hoops, stained them the dark brown. Then I put some of the fabric in the hoops used Fabric-Tac to glue them to the inside of the hoops and had three pieces of art for my little girl's room.
Close up of some of the hoops.
Fourth--- I made the mistake of buying wall stickers at Target thinking they'd work on textured walls. They don't. Within a day, almost all of the stickers fell off. To feel as though we didn't waste any money, I found three cheap panoramic frames and put the dots on the plastic outside of the frame. I never took a picture, but if someone really wants to see it---I will. I don't know if I like it enough to keep it in the room.

Fifth--- To finish it off--- THIS and THIS are on the little wall, right next to the closet. Overall, I'm really pleased with how everything turned out, but I'll take a little more time to think things through before I move onto the Knight's bedroom.

I used lavender and light green to accent with dark brown and white furniture.

Friday, March 5, 2010

Past Craft: Heart-felt Baby Toy

Sorry about the absence, my mommy duties have outweighed crafting because of a sick boy. :(
I'm only getting half of things done, so I thought I'd show off something I made last month.

I used the tutorial {HERE} to jump off of and created these for my daughter for Valentine's Day:

They are really simple and she's already had them in her mouth a few times.

All you need is: scrap fabric, ribbon, stuffing, extra jingle bell, krinkly plastic (from disposable wipes container and sewing notions.

I put the bell in one, the plastic cut into pieces in another, and put ribbons on the outside of the third. To connect them, I cut three long strips of a jersey fabric and braided them together. The ribbon also make it so they can connect to a playyard as well.

They may not be perfect, but I made them for her---and that's what counts.

Monday, January 25, 2010

Headband Holder

After I made my daughter's hair clip holder, I suddenly found that her headband storage became the problem. I knew where the clips where, but not the headband. Whoops. So I made this:


All I did was stain the board from JoAnn's. Then I used extra fabric from a previous project for her room to cover a few extra clothespins (I used fabri-tac, but mod-podge can be used too). Then I hot glued them all to the board and added a couple of sawtooth hangers on the back.

Cute headband storage. Done and done. Now I'll know where to find them.

giveaways

Thursday, December 17, 2009

Hair Clips & Holder

Before 'Princess' was born I went a little crazy making hair bows (a girl can never have too many) and all of these pictured went to VT sister who also recently had a girl, so I don't feel too bad for making so many:

Exhibit A

Exhibit B

Since I made so many bows, I needed to make a place to put them. Enter Exhibit C:

Here's what you need:

an old frame, ribbon and a glue gun---That's it!

Strip the old frame down. Throw away all the photo backing stuff and use pliers to take out the little metal pieces. Then flip the frame over and lay out your ribbon. Glue the free end to the frame, pull tight then cut. Glue the other end of the ribbon. Continue gluing ribbon until you reach the end. Then put the bows on the holder and hang it up for the world, your kids, to see.