Saturday, July 9, 2011

Star & Stripes Necklace

Diamond Glaze and I have a love/hate relationship. I LOVE what it creates, yet hate how it doesn't work for me. Every time I'd try to make a cute necklace pendant, the glaze would bubble and... grr... we just don't get along.

I'm slightly determined, so I bought circle pendants on sale a while ago, telling myself I'd try the necklace again. The problem was I could never really pump myself up to trying it again, mostly because I couldn't come up with a cute idea that I absolutely HAD to try.

Until the Fourth of July and it's patriotic beauty came around. I grabbed my pack of pendants and tried again.

This time, it worked.

Stars & Stripes Necklace


Gather It:
  • blank necklace pendant
  • scrapbook paper
  • scissors
  • diamond glaze
  • needle
Create it:
  1. Basically, trace the correctly-sized pendant circle onto the scrapbook paper and cut it out. I thought it would be great to have one Star and one Stripes pendant---hence the name of the necklace. I know, rocket science.
  2. Trim until it fits in the pendant and place it in flat in the pendant. Make sure there is no space between the back of the paper and front of the pendant.
  3. VERY VERY slowly drip the glaze into the pendant, until the pendant is full. Make sure not to get any bubbles because they will dry as bubbles (ask me how I know).
  4. Wait overnight to dry, then string onto chain, ribbon, whatever you want to put around your neck. Enjoy!

Tuesday, July 5, 2011

Patriotic Decor

Happy FIFTH of July! We had a fun neighborhood get together at our house yesterday (and my in-laws came in town for the holiday), so naturally I had to add a little bit more to my Patriotic decor. Here's what I got:

Stars and Stripes Banner


I completely spaced on creating a tutorial for this... if there's enough interest. It's a lot like the {USA Hang}.

Table Runner
Last year, I participated in a {U-Create Create with Me challenge} to make {quilted table runners}. I loved the idea so much that I've made one for almost every holiday. I just need to make St. Pat's next year and my day-to-day one and I'll have a complete set.

Subway art and Dresser Cover


Found the Subway art {HERE}, got the America at Hobby Lobby on sale, and used my extra fabric from the Table runner to make a quick cover. I love the extra color it brings in.

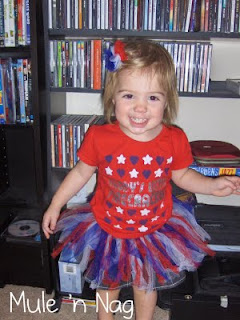
Cutie Tutu

I know she isn't a decoration, but I couldn't resist making her a Patriotic Tutu (since I had tulle leftover from the banner and door hang). Tutus are super simple; elastic sewn just smaller than your subject's waist and lots of loop knots to create the full skirt. I used the tutorial {HERE}. The only thing I did differently was cut the width of the strips in half, so they were 3 inches wide, instead of 6 inches. She LOVES it.

I also made the matching bow with three leftover strips, a little bit of wire, ribbon, alligator clip, and glue gun.

Did I mention I LOVE the Fourth of July? ;)

Saturday, July 2, 2011

Fireworks!

I found {THIS} idea and decided it needed to be tweaked to fit me and added to our growing Patriotic Decor. Our TV shelves just looked entirely non-festive.


Wooden Fireworks!

Gather It:
  • Wood--- mine is 7, 10, and 13 inches tall (2x2 wide)
  • Red, White, Blue Paint
  • vinyl/stencils for stars, stripes, and words
  • Drill & bits
  • wire (cut into 9 3-ft pieces)
  • needle-nose pliers
  • pencil or marker
Create It:
  1. All three fireworks need a base coat of white. I used glossy wood stain, but it would be just as easy (probably easier) to use craft (acrylic) paint.
  2. After they dry, choose which one you want to be stars, stripes, and words. For the Stars/Stripes, place the vinyl over it and then paint over any white area you see.
  3. For the white firework, use the negative vinyl as a stencil and paint the words on.
    (I used the Jane Austen font). As always, I'll email you the doc, if you have a silhouette. Yes, I used the church news to protect my table--- hopefully that's not too bad. ;)
  4. Add a few coats and wait to dry.
  5. After dry, drill a whole in the center top for the wire 'whicks,' I used the tiniest bit available.
  6. Holding the firework in one hand and wire in the other, start to fish the wire in the hole. When it gets difficult, use the needle-nose pliers, instead of your fingers. Repeat three times for each firework.
  7. To get the whick curly, wrap the wire (starting from the top) around a pencil or marker (I used a fat dry-erase one). Continue until you get to where the wire and wood meet, then gently pull the marker out. Repeat for the rest of the whisks!
  8. Enjoy your new fireworks! Sure to bring that extra BANG to your celebrations!